Wednesday, December 30, 2009

Flan - Noxrox Returns


I can't end it. Guest Blogging though I do have a recipe that I have been cooking for the past couple of months that is absolutely amazing. I will be cooking it again tonight and will post it later this week. Here is NoxRox back with another delicious dish.

For this recipe, the oven needs to be at 325. The Flan starts with making caramel and putting that in the bottom of a baking dish or several ramekins. To make the caramel, mix 1 cup sugar with 1/4 cup water. Slowly bring the mixture to a boil and stir occasionally. Eventually, a sweet chemical reaction will occur and the sugar will melt and turn brown and look like caramel. Have the dish or ramekins ready. Remove the caramel from heat and quickly pour into the desired container(s). It hardens pretty quickly.


Then begin to prepare the custard. The whole concept reminds me of scrambled eggs with a lot of milk in them. The milk needs to be heated in a pot until in boils, about two cups. While the milk is boiling, crack open 5 eggs or so (you can also use extra yolks) and beat them with a whisk.

Add the hot milk and some sugar, about 1/2 cup. Vanilla, salt, nutmeg, cinnamon can be added or omitted to your desired taste. I would definitely include the vanilla. Once the egg mixture is all whisked together, pour it over the hardened caramel in the prepared pan(s). For the custard to cook evenly, it needs to be placed in a water bath. Put this whole apparatus in the oven.


The flan will be done when it looks set. It will shake a little bit but sort of looks like the way jello should. This will take longer if it is all in one dish, about an hour and 15 minutes, or shorter if you use ramekins, about 50 minutes.
After it is done, you should let it chill in the fridge for a couple of hours. I couldn't resist trying it before it chilled. What happens is all of the caramel goes to the hole that you poked in the custard. It still tastes great though. This happened after it chilled anyway, so I say that if you want to try it hot, go for it!

Monday, December 7, 2009

Mr. RstataSas - Vegetarian Sushi


Wait, why is guest month still going on? Wasn't it supposed to end a few weeks ago? Yes, it was but life is busy and I still have delicious food to post. This meal comes from Mr. RstataSas, king of statistics and figuring out why the poor are always getting screwed with health-care. I was lucky enough to take part in eating and making this meal. It was my first time making Sushi. Best thing about Sushi is you can wing it, add whatever you want, and it will be delicious. The post and pictures are by Mr. RstataSas.

Think of this setting as five meals:
breakfast, brunch, lunch, dinner, and dessert.
Or Tex-Mex, Italian, vegetarian, Japanese, and Wisconsinite.

So the appetizer / breakfast / Tex-Mex was a breakfast burrito sushi roll. Basically you take avocados and wrap them up with egg and melted cheese. The egg only serves as the burrito/seaweed component and also adds that great egg flavor that most cheeses lack on their own.


The 1st course, a.k.a. brunch e.g. Italian platter was a sushi roll filled with brown rice, mozzarella cheese, and roasted peppers. This is a particularly difficult dish, because not everyone enjoys fire-roasted peppers drizzled with olive oil. You've been warned.


Next, the pan-veg-asian-fusion requires the hand-grinding of veggieburger patties and your favorite mango salsa. Anyone wishing to replicate this dish can purchase a bathtub of mango salsa at costco. After combining these two ingredients in your favorite sizzling frying pan, wrap them up in brown rice & seaweed & avocado, and eat them before anyone else has a chance
.
Finally, the main course: avocado, cucumber, brown rice, wasabi, and seaweed. Kind of boring, but you won't have leftovers unless you make a ton and have no friends. Even then, these five ingredients will probably make you friends, but I'm sure you don't need them.

Rolling technique is important.

The final spread!!!!

For dessert, frozen blackberries, rasberries, blueberries, bananas, and some skim milk go into a blender. A tablespoon of vanilla extract should follow; this little gem will make your diners believe you when report that you've used whole milk and not skim.

Thursday, November 12, 2009

NoxRox - Butternut Squash Soup

Guest month continues with NoxRox, a follower and master cook. I have one more guest lined up then I am on my own again. As an aside, I am really enjoying using fall vegetables in my cooking these days. Lots of squash, brussel sprouts, and pears. All delicious.

Nox Rox -

So easy, and so good! Cut the butternut squash in half. Put some oil on a baking sheet and put the squash face down in the oil. Bake for about an hour and a half at anywhere between 425-450. The squash should be nice and soft when you it is done.


Chop up some garlic, onions, shallots, or whatever else might taste good and brown a little bit in a pot with some butter or oil.
Scoop out the squash into the same pot with the onions along with some vegetable stock. I used a cup and a half, but use more or less depending on the amount of squash and your desired consistency. Let the whole mixture come to a boil. Turn off the burner and put the whole thing in a blender.
Puree the soup until the desired consistency - about thirty seconds. Put it back in the pot to keep it warm.
Serve as is or add spice to taste. I like mine with a little Greek yogurt in it - Delicious!

Friday, November 6, 2009

Acorn squash and apple


Guest blogger month is almost over. I have one more guess blogger lined up, and one more recipe from Mr. Boy.

Mr. Boy again, this time with a side dish/dessert. It's an acorn squash and apple salad.

Ingredients:

Acorn Squash
2 Apples
Walnuts
Cinnamon
Brown Sugar/Maple Syrup
Dash of salt
Butter

Peeling the acorn squash can be a pain, but if you boil it for about 15 minutes then you can just peel the skin right off with your fingers (cool it first). Then cut it in half, scoop out the seeds, and then cut it into one inch chunks. Core and cut the apple into one inch chunks as well. Roughly chop the walnuts and throw them into the mix, then sprinkle on cinnamon, and brown sugar. If you don't have brown sugar, maple syrup works just as well. Don't go overboard on the cinnamon because it's so strong, but a liberal dose of brown sugar/maple syrup will make it nice and sweet. Sprinkle on salt to taste and add a few small dollops of butter to melt in when you cook it.

You can either bake it in the oven 350 degrees for about an hour, or put it in the microwave for 7 minutes, stir it, and cook it for seven minutes more. Serve hot.

Monday, November 2, 2009

Mr. Boy - Eggplant Parm


I found a guest blogger more from my heart. If Mr. Solo was the white collar, Mr. Boy is definitely the blue collar chef. The bottom line is he gets it done. Enjoy his first meal, cooked from vegetables that he picked with his own hands.

Mr. Boy's eggplant parm:

I like to keep recipes short and sweet. It shouldn't take much longer to cook it than it does to eat it.
Ingredients:

Eggplant
Mozzarella/Parmesan cheese
Tomato sauce
Eggs
Bread crumbs
Seasoning (Garlic powder, onion powder, oregano, etc.)
Olive oil

This is pretty much an eggplant casserole. Working as a sharecropper on a CSA farm, I have to find ways to make otherwise inedible food palatable, and voila! Turns out you can eat eggplant after all.

Preheat oven to 300 degrees.
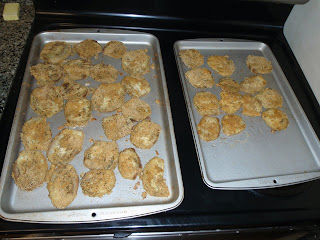
Beat the eggs together in a bowl, and on a plate mix the bread crumbs with your seasonings. Cut the eggplant into thin slices and dip them in the egg batter, then coat each side with the seasoned bread crumbs. You'll want to bake the eggplant first to make it nice and crispy, so lay the slices out on cookie sheets and drizzle olive oil over them. Then put them in the oven and bake them on each side for about five minutes.

Once both sides are baked, turn the oven up to 400 degrees and make the casserole while the oven is heating up. This is simply layering the eggplant, tomato sauce, and cheese. Start by covering the bottom of the dish with the breaded eggplant, then cover that thinly with tomato sauce, then cover that with cheese, then cover that with eggplant, that with tomato sauce, that with cheese, etc. until all your eggplant is used up. It can be two layers, three layers, really it just depends on how much eggplant you have and how deep your dish is. Bake that for 20 minutes or until the cheese is nice and melted.

Monday, October 26, 2009

Mr. Solo Part 2 - Grilled Cheese and Tomato Soup


The main man, Mr. Solo, is back for round two. Exciting news, I have two more guest bloggers lined up maybe more. And here he is....

Mr. Solo -
The idea for the second dish has actually been kicking around in my head for about a month for no better reason than hunger and the fact that my roommate and I seem to share a love of pan-fried bread. It's a grilled cheese sandwich with cream of tomato soup. Take some Challah bread, some dried oregano or other herb, and heat up some oil in a non-stick frypan. Throw the bread on there until it's soaked up most of the oil and is starting to brown. In the meantime baste some swiss cheese in truffle oil (you've essentially ended any effort to make this dish taste less than awesome once the truffle oil makes a showing). Flip your bread, throw the cheese on to melt for a few more seconds. For style points, add caramelized onions and chopped chives to the finished sandwich.

The tomato soup is actually pretty involved, but well worth the effort. You need to roast roma tomatoes with olive oil/herb of your choice (thyme works well) at 400°F for an hour. You also need to throw some standard tomatoes through a food processor, and then throw the pulp on a strainer with some salt in the fridge overnight. All the liquid drips out (incidentally, you've just made tomato water which has about a hundred amazing uses) but what remains is your very own homemade tomato paste. Fire up some onions on the stove with some butter, let them rock until they're translucent, throw in some rough chopped normal tomatoes, then the roasted tomatoes, thyme, bay leaf, and water to cover, and let that simmer down. When you're finding that the water is coming out of the tomatoes and things are trending more liquid than creamy, throw in your homemade tomato paste. It soaks up all the excess liquid like a friggin' sponge. When everything's softened down, throw your concoction through a fine-mesh strainer. Add a junkload of butter, a touch of heavy cream, salt to taste, back in the pot and crank the heat until the whole thing comes to a boil, then immediately turn off your heat. D for done.

Wednesday, October 21, 2009

Mr. Solo - Tomato Tatare and Green Beans


The next guest is the one and only Mr. Solo. If you don't know who I am talking about, trust me.... you know!!!! Good thing setdinnerhereveg has a executive board of only ONE, because if we put this to a vote, I might lose my head chef/blogger status... replaced by Mr. Solo.

He contributed two courses of a fantastic meal that he cooked for fellow friends and forwarded the pictures and description. Here is part one.

I guess [Mr. gorgeous] wasn't kidding about having a guest month on his blog! SO without further ado...a little bit of background on this I'm a pretty voracious meat eater, but with an increasing cadre of vegetarian friends. In the interests of being able to have people over for dinner every once in a while without thrusting steaks on unwilling palettes I've been forced to explore their strange and unfamiliar world. Fennelwhatnow?

Being a meat eater at heart, the first dish is actually a riff off of raw steak tartare, the idea being that you could use tomatoes instead and approximate the same color and texture as uncooked beef. I've been referencing the French Laundry cookbook, a recent Bible of mine, so I definitely can't take credit for the concept. There's two main techniques you need for this dish, quick blanching and slow roasting. Basically you take some vine-on tomatoes, dunk them in boiling water for about a minute, and then immediately shock them in ice cold water. What this lets you do is remove the skins really easily. Then you quarter the skinned tomatoes, remove and discard the pulp, add some olive oil, salt, and thyme, and slow roast the remaining tomato pieces in the oven at 250°F for about 2 hours. What you get is super concentrated tomato with a somewhat more solid texture, that you can rough chop, add chopped shallots and toss in a ring mold. Tartare: done. The salad on top is green beans in a mixture of heavy cream and red wine vinegar (with a pinch of salt), and then the sauce is the oil drippings from the roasted tomatoes.

Monday, October 19, 2009

Friday, October 16, 2009

Plums by Ms. Pumpkin


Greetings readers! Ms. Pumpkin here, blogging from the great state of Missouri. Recently I had the joy of spending a weekend in our nation's capital with Mr. and Mrs. gorgeous. We had a fabulous weekend of cooking, eating, drinking and other drinking related activities. Such fun!

A Sunday trip to the Dupont farmers' market left us with an abundance of over-ripe plums that had to be used immediately. We decided to finish that night's dinner with a couple of plum-based desserts: kuchen and sorbet.

Kuchen, German for “cake” can come in many forms. As the state dessert of South Dakota (http://www.state.sd.us/state/sdsym.htm), it's made with a yeasty crust and a custard filling that is enjoyed while wearing olde-tyme German garb. In contrast, our plum kuchen was based on a dense cake flavored with ample amounts of lemon zest and white sugar. We topped it with halved, pitted plums covered in more sugar and some cinnamon. After nearly quarter of an hour baking in the hot oven, the tiny kitchen was filled with the aroma of lemons, plums and cinnamon. The golden cake had plumped up around the fruit, which had softened under the melting sugar and cinnamon. Once it was cooled, the cake easily slipped out of the Gorgeous's nifty spring form pan. Thank God for wedding registries.

We planned to serve a plum sorbet along side our kuchen. The ingredients were simple: plums, water and sugar. The recipe had me blanch and peel the plums before blending them. After scalding my delicate fingers a few times, I gave up on these two steps and just tossed the pitted plums into the Magic Bullet. You can leave the peel on without affecting the taste, but don't leave in the pits. I don't think the Magic Bullet would be very happy. Alone, the sorbet was nothing spectacular, but it paired nicely with the heavy kuchen.

All in all, the dessert was a sweet finish to a wonderful weekend. Happy cooking!

Wednesday, October 14, 2009

GUEST MONTH!!!!!

October is guest month. Get ready for delicious vegetarian recipes prepared by friends and readers of Mr. gorgeous. The first guest is the one and only Ms. Pumpkin.

Friday, August 21, 2009

Baked Orzo


Made this dish last night from a recipe in the NYT. When I began cooking it, the recipe seemed like it was going to be a breeze. Cut up the vegetables and throw them with the orzo, bake and you have the meal. Well it was a little bit more complicated than that because most of the vegetables needed to be cooked beforehand. So the prep took quite a while, about forty minutes. I think we then shortchanged the baking a little bit because it was getting late and Mrs. gorgeous and I were hungry.

The orzo had a lot of flavor especially with all the cooked vegetables, which is a necessary though lengthy process. Frying the vegetables in a small amount of oil beforehand softens them up and brings out there flavor that mixes in with the orzo well. I also think that baking it slightly longer would have been good. The orzo was cooked beforehand in water, and I thought baking would have added a little crunch but I do not think we had quite gotten there yet.

Another note: I think if I were to cook it again I would double the recipe so that there were more leftovers. Only going to get about four plates total out of the recipe (though NYT says serves six) and it would be nice for the effort put in to get a little more return. Mr. and Ms. duke/environmental science, check out that baking pan.

Sunday, May 31, 2009

Leftover Mash-up and Fry Dough


I had a lot of leftover vegetables and decided to make a sort of mash-up dish. I cut up all the remaining vegetables (potatoes, broccoli, leeks, carrots, can't remember what else but it was a clearing the refrigerator job). I stir fried the vegetables and then added in coconut milk, turmeric, and cumin (No curry powder). The sauce was sweet and delicious and the vegetables mixed in really well.

The fry bread was from a packet that my dad purchased in North Carolina. You mix up the dough with water and then fry them in a small amount of oil. They puff up like the you can see above.

Overall food was great. Easy, fast, and used up all the various vegetables that remained in the fridge before they went bad.

Sorry for the long absence, trying to get back into this writing thing.

Pizza


Every once in a while Ms. gorgeous and I make pizza at the house. With our wedding coming up, we have gotten some sweet gear to cook the pizza on (pizza stone, pizza board, rolling pin, and pizza cutter). We have yet to make our own dough out of laziness, timing issues, and we have a great spot down the street to buy dough (Vace - as Supertaster says, best pizza in DC), plus having a food processor will make life much easier.

We also bought the different sauces for the Pizza (Pesto and Tomato), but can easily make these in the future when we have a better garden. The nice part of Pizza is the community and creativity aspects. Everybody can customize their own (so everyone is happy) and you get inspirations and taste ideas from those around you that are making their pizza. If you are lucky you they will give you a slice of their creation.

A topping that I really enjoy is butternut squash that has been peeled and fried in olive oil and salt and pepper. Though the season for squash has ended, make sure you try it when the time becomes right again.

Monday, May 18, 2009

The Main Course - Onion and Mushroom Quiche


This was the main course for Mr. and Mrs. Prison. A full-fledged quiche. Now, of all foods quiche is one of the few that I remember growing up and disliking while my sister enjoyed it. She was usually the picky eater. For some reason the whole eggs, ham, and cheese thing grossed me out.

I have finally grown out of that dislike, so I decided to make one for the main course of the meal. It seemed like it would go well with Kale and Sweet Potatoes. The recipe was from the Vegetarian Cookbook linked to before. It was really good. The hardest part was making the crust by hand. They recommend using a blender or a food processor, which I don't own. Made it by hand and it turned out well. The rest was easy. Fry up the onions and mushrooms, pour in the eggs. It was good. Better with the company.

Saturday, May 16, 2009

Kale and Sweet Potatoes

A quick little post since it has been so long. I made this dish a while ago when two friends came over for dinner. It was Mr. Prison and Mrs. Prison who came over. This was the vegetable portion of the meal and the next post will be the main course. Very easy to make these dishes and a lot of good tastes.

For the Kale just cut out the stems if the leaves are big or just leave them in. Then put some oil in a pan with some garlic and salt and fry for a few minutes to loosen up the stalks. Add water and let the leaves braise in the covered pan. The leaves should become slightly greener when they are cooked. Nice easy and healthy. In the past I threw away the leftover water if there was any but you could save it for a broth or drink it for the nutrition.

Sweet potato recipe is from my man Bittman. He actually had this on a video post from the fall (article/video). Peel the sweet potatoes and then grate (use a food processor if you got it) them so they are in long threads. Add oil to a frying pan or a big pot (whatever will fit all the potatoes) and then fry for 5-10 minutes until they are softened. While this is going on, bust up some garlic so the flavors are released, and add garlic, 3 tablespoons of butter, and fresh sage to a sauce pan. Put the pan on medium and brown the butter (takes about 5 minutes - at some point the yellowish butter will turn brown and a great nutty flavor begins to spread throughout the kitchen). Pour the butter over the sweet potatoes and serve. A quick and easy way to prepare sweet potatoes that often take a long time to boil and soften.

Wednesday, April 29, 2009

Beet and Squash Faux Tomato Sauce

I experimented with a dish like this a few months ago when Ms. gorgeous and I had leftover beets and squash, and it turned out pretty well. On vacation with my parents I tried it again with the principle goal being to make the sauce and it turned out great. The flavor of the beets and the squash together make a wonderful combination and go incredibly well with pasta just like normal tomato sauce. A nice end of winter coming into spring sort of dish.

First you can see the pasta on the left above. It is sort of a funky circular pasta. Unique and delicious. My parents brought that with them.

The sauce is incredibly easy to make only requiring beets, squash (I think we used winter), oranges, and salt and pepper. It will take as long as the beets and squash take to cook plus about 10 - 20 minutes to prepare the sauce (Pasta should be made at the same time).

Prepare the beets and squash. For the beets boil in water until they are tender when pricked with a fork - about 45 minutes and you may need to refill the water to keep the beets covered. For the squash, slice in half and brush a small amount of olive oil on each end. Place face down on a baking sheet and cook for about 30-45 minutes at 400 degrees until tender.

Once the ingredients are cooked, peel the skin off the beets and put into a blender saving one on the side. Scoop out the squash and put the flesh in the blender as well. Blend until smooth (Ms. gorgeous one complaint was it was too smooth so maybe pulsate and not puree). While blending, dice the saved beet into small pieces and put to the side. Ms. gorgeous had the great idea to put oranges on top to add a little zing to the sauce. It turned out wonderfully so additionally peel and cut an orange into small pieces.

Taste the sauce and season with salt and pepper. It is ready to be eaten.

Put it on top of your favorite pasta, add some of the beets chunks to give it some additional texture and then the orange to offer a contrast in color and flavors. The sauce looks like pure beets but the winter squash offers significant flavor and background to the beet taste. Oranges are a little funky but give a sweet kick, definitely a plus.

Enjoy, I will definitely be making it again.

Monday, April 27, 2009

Guacamole


A month or so ago, Ms. gorgeous and I went to a restaurant, Rosa Mexicano in Gallery Place. One of their specialties is to wheel around a cart of avocado's and make guacamole right there for you. It is pretty sweet. On this particular day though the avocado's were not ripe, which is not surprising having watched them cart around hundreds of avocado's, but it made me disappointing.

What was a man to do? Gorgeous decided to make his own Guacamole = delicious.

Concept again was easy as pie. I think variations could really make this great, but I went for the standard.

All you need are the following ingredients. 2 ripe avocado's (the skin should give way when you press in), 1 tomato, 1/2 an onion, 1/2 jalapeno, cilantro, and salt. Cut everything really finely except for the avocado. This releases the flavors and lets the tastes blend together really well.

Cut the avocado in half as shown in the top picture. I think this looks awesome. Take your knife and hit it against the seed so it sinks in a little bit. Twist and out pops the seed. Next scoop out the avocado into a bowl. Add all the previously chopped ingredients and some salt. Crush with a fork or spoon, or if you are really sweet a Molcajete (mortal and pestle - shout out to Papa gorgeous and the Mow-Ka-Je-Te). Serve with chips and bamn you just one upped Rosa Mexicano.

I would be interested to hear other chef's variation or different flavors that you add in.

Friday, April 3, 2009

Hummus


This is another dish that I have been making a crazy amount of lately, and comes from the book of add the basics and the rest is for the flourish. It is simple, cheap, and has highly variable flavor depending on the flourish that you choose. Just today I made it on vacation with my parents and Ms. gorgeous.

The game plan for the basics is chickpeas, olive oil, and tahina. From there you can go wild... Sometimes I put in pepper flakes or lemon juice and definitely garlic.

Add all of these ingredients into a blender and blend until you get the consistency desired. I usually do not dump out the chickpea liquid because it has some flavor and you need some liquid to keep the humus moist. Also, I add some water to get the humus looking right. Our blender broke the other day so now we depend on the infomercial contraption to the right (the magic bullet). It works ok, but I am looking forward to getting a blender soon.

Once created I put the hummus into a bowl and add Paprika to the top which makes it looks more sophisticated (as shown above). The next step is eating it. I generally use pita, celery, or carrots to eat with my hummus. Sometimes Ms. gorgeous or myself create pita chips by cutting the pita into slices and pouring olive oil and herbs on top and then toasting. Recently I have been making some great sandwiches by stuffing a pita with hummus and lots of mixed vegetables. Very tasty!!!

Monday, March 23, 2009

French Onion Soup


Finally we get to the final dish. I have been very busy with school so cooking and posting has been a challenge, but I will try and do better now that spring break is coming up. My posts will probably always come in spurts.

French Onion Soup..... I love French Onion Soup, but do not order it enough at restaurants. It is perfect for me because it is salty, cheesy, and messy. It is one of those dishes that I almost switch my order at the last second because it sounds so great.

For this dish I was able to use the last of the vegetable broth that I had made a couple of weeks before. The broth was reddish but once it was cooked with onions for a long time the color turned to what you see above. I don't remember the other ingredients that well but obviously a lot of onions and maybe some thyme or other spices. It was a basic recipe but took a little while for the broth and the flavors to come out of the onions.

The best part for me is the last step when you cover it with cheese and bread and then broil it until the top melts. This is great because it looks awesome and I can't wait to dig my spoon and get that long stretch of cheese from the bowl to my mouth.

The dish was good, just like the restaurant. A highlight of cooking for me is cooking dishes that I enjoy at restaurants and having them taste as good or better. I can check it off my list so that I do not need to order it any more because I know I can do it on my own at home.

Wednesday, March 18, 2009

Vegetable Moussaka

We are on the fifth dish for the night, and we are finally getting to the good stuff. I had not heard of this dish before, but it sounded great and I was later told by MANTIGERBEARWOMAN that it is a a Greek/Arab dish that tends to include ground meat. Of course that was out of the question, but the dish was great.


The dish was composed a layered mixture of a sauce made of lentils and tomato sauce with additional vegetables added (onions, peppers) and slices of eggplant. It was then covered with a creamy mixture of milk, cornstarch, and butter and topped with some Parmesan cheese. Finally I baked it in the oven for about forty five minutes.

The hardest part of this recipe was frying the eggplant slices as recommended because it soaks up oil and takes a long time. I decided to bake them. I bet the difference was not that noticeable and it saved time and was more healthy.

The taste was really nice. I think if I used fresh tomatoes it may have been even better, but the cream sauce was a great compliment to the heavy vegetable flavors. To the right should be a picture of the plated meal, which like most of my dishes looks like a pile of red stuff.

Monday, March 16, 2009

Green Beans with Pine Nuts

3rd best dish of the night were green beans with pine nuts. This is sort of a classic tasty food where anything or nothing can be added to change the flavors a bit. Ms. gorgeous loves to make it with lemon and almonds.

The recipe in the cookbook called for pine nuts and paprika. Usually I can't taste paprika (maybe I need to buy some nicer stuff) and tend to use it more for the great color. This time I added a ton of it and I could taste a subtle flavor and saltiness to it. It was a nice touch.

Nothing else that special was done to the greenbeans except that were slighly boiled before pan frying. The recipe called for it and I had previously done this because I think it imparts a better texture on the greenbeans. I also used a lot of oil, too much, and will cut back on it in the future.

Friday, March 13, 2009

Stuffed Mushrooms

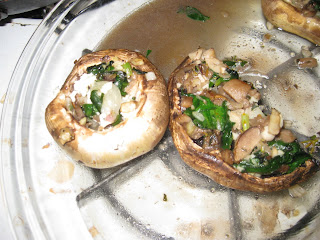
I thought I would post the dishes from the meal in the order that I enjoyed them. The first picture is of the stuffed mushrooms above. I used two different types of mushrooms, Portobello and button. The recipe was pretty basic. I cut off the ends of the mushrooms, chopped them up with garlic and onions and fried them. Then I fried some spinach and mixed the two together. Put them into the caps (that were previously boiled for a few minutes) and then baked them in the oven for 20-30 minutes at 350. Half of the mushrooms I also added Feta cheese.

They were good though I think that there could have been a little more filling for them. I like that is was not too bready, like other stuffed mushrooms tend to turn out. Also, I preferred the Portabello mushrooms and will only use these in the future. Maybe some more vegetables mixed into the stuffing will help "fill" them out a little bit.

I forgot to take the picture when I first got them out so all you get to see are the leftovers.

Potatoes and Blueberry Sorbet

I will post about these first because I did not take any pictures of them. To start off I am not a big fan of potatoes (too much starch or something), but Ms. gorgeous said that these were especially good. The cookbook said that the temperature of the oven needed to be 425 and since everything else that we were cooking needed it to be 350, we saved these for last... sort of an after dinner treat. They took a long time to cook and after taking them out once we put them into the oven again for more time and forgot about them for a long time. A few got burnt and they were okay, but by that time I was full and not wanting anymore food. Ms. gorgeous took them to school.

The sorbet was excellent. Last fall I had a craving for making my own ice-cream so I went out and bought an ice cream maker. Recently we have been making a couple of sorbets. We use 2 cups water to one cup sugar, 1/2 what the recipe book says and it tastes great. For this sorbet we used frozen blueberries and some canned blueberries (Label on the Can - Caviar of Maine) and some lemon juice. It came out delicious.

Tuesday, March 10, 2009

The Meal

Last Saturday, I had some time in the afternoon and we were having a few people over for dinner. Ms. gorgeous wanted me to cook up some vegetarian fare for the group so I went at it. In all we made six different dishes from this cookbook, The Vegetarian Cookbook. Each were great but can also be improved. I have some exams coming up next week so my posts may be a little infrequent but I will try to post about each dish and my thoughts.

The meal -

French Onion Soup
Stuffed Mushrooms
Roasted Potatoes
Green Bean with Pine Nuts
Vegetable Moussaka
Blueberry Sorbet

All in all a delicious meal. Each dish was pretty easy to handle making on its own but the time I gave myself (about 2.5 hours) and the number of dishes made it challenging to get them all prepared. One of the dishes, the potatoes, needed to wait to be cooked until later since I ran out of time, but in the future I would have prepped these earlier and just rewarmed them for the main meal.

Saturday, March 7, 2009

Chili


Here is another example of a throw everything into a pot and out comes something delicious dish.  Easily can be made into a meat dish by adding whatever cooked meat you desire.  I searched for vegetarian chili on the web and out popped this recipe, but the premise is the following,

cut up a bunch of vegetables (green peppers, celery, carrots, tomatoes, jalapeno peppers, onions, anything that you want)
open up a bunch of cans (red kidney beans, crushed tomatoes, garbanzo beans, black beans, corn, more?)
get some spices ready (salt, pepper, cumin, bay leaves, garlic, chili powder and on and on)

Fry up the onions and garlic to release their flavor
Add the spices until you see fit
Add the vegetables
Add the cans except the corn
Let simmer/boil for thirty minutes-one hour
Add the corn
Serve with condiments like cilantro or parsley

Every time chili is made it will be a little different.  I went heavy on the chili powder this time and it was good.  Slowly as you make more and more you can figure out what vegetables and spices are essential (corn for me) and what can be skipped or left out.

A super positive is that I now have about a gallon of chili for the week to eat.  Left-overs galore. 

Friday, March 6, 2009

Granola


This is a vegetarian dish for everybody.  The best part about it is if you don't like something then you get to leave it out.  Ms. gorgeous is actually the Granola maker of the family.  She learned to make it from her mother.  

Three reasons to make your own granola.

1)  It is cheaper or close to the same price as cereal.
2) You know exactly what is being put into it.  Look at the back of a cereal box sometime and see how many ingredients you do not know or understand.
3) You get to customize it for your own tastes.

Basic idea, get some oats (not quick oats) from any grocery store and throw them in a bowl. Whole foods sells it in bulk for $1.39 a pound.  Then add whatever sounds like it will taste great, some combination of dried and wet ingredients.

Dried cocunut, raisins, craisins, figs, wheat germ, sunflower seeds, apricots, cinnamon, milled flaxseed, anything. A quick note about the last two - Great for your health, and if you add flaxseed make sure it is milled.  Unmilled flaxseed just runs right through your body so the health benefits are lost.  Also, if you do not like flaxseed, who cares, all the other flavors dominate the taste and you get the health benefits.

Maple syrup (the real stuff) and honey are key for the wet ingredients.  Add one or both.

After throwing all the stuff into a bowl, stir it up so that it well mixed.  Spread it out on a baking sheet and bake for 30 minutes at between 250-300.  It is hard to mess this up unless overcooked.  Every ten minutes or so, re-stir the granola so that it gets heated evenly.

Let is sit, and enjoy your homemade granola for a week before it is time to make more that will be completely different from the previous batch.