Monday, January 11, 2010

Vegetarian Banh Mi

In celebration of my mentor's glorious return to the blogosphere I decided to cook whatever he did, but vegetarian style. This sandwich is absolutely delicious with so many different tastes coming through: the strong meaty flavors of the tofu and marinade, the sour of the slaw, the creaminess of the mayonnaise, the spice of the Sriracha sauce, texture of the fried egg, and chewiness of the bread. All of these in every bite, it is really an incredible sandwich. So good that Ms. gorgeous and I cooked it again two nights ago. It took a while to make all the separate pieces but it was well worth it.

The basic set-up for the sandwich is the following; bread, protein (meat/tofu), pickled vegetable, spice, mustard/mayonnaise (optional), herbs (optional), plus much more. Below are the different parts that I cooked to create my sandwich.

For the tofu portion, I found a recipe here. Seems like the entire site is focused on the Banh Mi so you can really research the different possibilities. Letting the tofu marinade was great because it absorbed a lot of the flavor in the marinade and it cooked very easily due to the oil it has soaked up.

For the pickled portion, I made a simple vinegar slaw with radishes and carrots. I boiled about a cup of vinegar, 1/2 a cup of sugar, some onions, and a mixture of spices (Turmeric, salt, mustard seed). After the onion softened I poured it over the carrots and radish mixture. Very good.

I was going to make my own mayonnaise but I did not get to it, but I had made my own bread earlier that day. The yeast was a little dead but they still had a little metabolism left.

Finally, I added a fried egg to the sandwich. Fried eggs fit into the category of "never a bad idea to add to a ________". It held true for this meal.
Assembly was fun. Squirt some mayonnaise and Sriracha sauce on the different sides of bread. Add the tofu slices and some slaw. Finally top with the fried egg, some chopped cilantro, and a little pepper. It is ready to enjoy.

Wednesday, December 30, 2009

Flan - Noxrox Returns


I can't end it. Guest Blogging though I do have a recipe that I have been cooking for the past couple of months that is absolutely amazing. I will be cooking it again tonight and will post it later this week. Here is NoxRox back with another delicious dish.

For this recipe, the oven needs to be at 325. The Flan starts with making caramel and putting that in the bottom of a baking dish or several ramekins. To make the caramel, mix 1 cup sugar with 1/4 cup water. Slowly bring the mixture to a boil and stir occasionally. Eventually, a sweet chemical reaction will occur and the sugar will melt and turn brown and look like caramel. Have the dish or ramekins ready. Remove the caramel from heat and quickly pour into the desired container(s). It hardens pretty quickly.


Then begin to prepare the custard. The whole concept reminds me of scrambled eggs with a lot of milk in them. The milk needs to be heated in a pot until in boils, about two cups. While the milk is boiling, crack open 5 eggs or so (you can also use extra yolks) and beat them with a whisk.

Add the hot milk and some sugar, about 1/2 cup. Vanilla, salt, nutmeg, cinnamon can be added or omitted to your desired taste. I would definitely include the vanilla. Once the egg mixture is all whisked together, pour it over the hardened caramel in the prepared pan(s). For the custard to cook evenly, it needs to be placed in a water bath. Put this whole apparatus in the oven.


The flan will be done when it looks set. It will shake a little bit but sort of looks like the way jello should. This will take longer if it is all in one dish, about an hour and 15 minutes, or shorter if you use ramekins, about 50 minutes.
After it is done, you should let it chill in the fridge for a couple of hours. I couldn't resist trying it before it chilled. What happens is all of the caramel goes to the hole that you poked in the custard. It still tastes great though. This happened after it chilled anyway, so I say that if you want to try it hot, go for it!

Monday, December 7, 2009

Mr. RstataSas - Vegetarian Sushi


Wait, why is guest month still going on? Wasn't it supposed to end a few weeks ago? Yes, it was but life is busy and I still have delicious food to post. This meal comes from Mr. RstataSas, king of statistics and figuring out why the poor are always getting screwed with health-care. I was lucky enough to take part in eating and making this meal. It was my first time making Sushi. Best thing about Sushi is you can wing it, add whatever you want, and it will be delicious. The post and pictures are by Mr. RstataSas.

Think of this setting as five meals:
breakfast, brunch, lunch, dinner, and dessert.
Or Tex-Mex, Italian, vegetarian, Japanese, and Wisconsinite.

So the appetizer / breakfast / Tex-Mex was a breakfast burrito sushi roll. Basically you take avocados and wrap them up with egg and melted cheese. The egg only serves as the burrito/seaweed component and also adds that great egg flavor that most cheeses lack on their own.


The 1st course, a.k.a. brunch e.g. Italian platter was a sushi roll filled with brown rice, mozzarella cheese, and roasted peppers. This is a particularly difficult dish, because not everyone enjoys fire-roasted peppers drizzled with olive oil. You've been warned.


Next, the pan-veg-asian-fusion requires the hand-grinding of veggieburger patties and your favorite mango salsa. Anyone wishing to replicate this dish can purchase a bathtub of mango salsa at costco. After combining these two ingredients in your favorite sizzling frying pan, wrap them up in brown rice & seaweed & avocado, and eat them before anyone else has a chance
.
Finally, the main course: avocado, cucumber, brown rice, wasabi, and seaweed. Kind of boring, but you won't have leftovers unless you make a ton and have no friends. Even then, these five ingredients will probably make you friends, but I'm sure you don't need them.

Rolling technique is important.

The final spread!!!!

For dessert, frozen blackberries, rasberries, blueberries, bananas, and some skim milk go into a blender. A tablespoon of vanilla extract should follow; this little gem will make your diners believe you when report that you've used whole milk and not skim.

Thursday, November 12, 2009

NoxRox - Butternut Squash Soup

Guest month continues with NoxRox, a follower and master cook. I have one more guest lined up then I am on my own again. As an aside, I am really enjoying using fall vegetables in my cooking these days. Lots of squash, brussel sprouts, and pears. All delicious.

Nox Rox -

So easy, and so good! Cut the butternut squash in half. Put some oil on a baking sheet and put the squash face down in the oil. Bake for about an hour and a half at anywhere between 425-450. The squash should be nice and soft when you it is done.


Chop up some garlic, onions, shallots, or whatever else might taste good and brown a little bit in a pot with some butter or oil.
Scoop out the squash into the same pot with the onions along with some vegetable stock. I used a cup and a half, but use more or less depending on the amount of squash and your desired consistency. Let the whole mixture come to a boil. Turn off the burner and put the whole thing in a blender.
Puree the soup until the desired consistency - about thirty seconds. Put it back in the pot to keep it warm.
Serve as is or add spice to taste. I like mine with a little Greek yogurt in it - Delicious!

Friday, November 6, 2009

Acorn squash and apple


Guest blogger month is almost over. I have one more guess blogger lined up, and one more recipe from Mr. Boy.

Mr. Boy again, this time with a side dish/dessert. It's an acorn squash and apple salad.

Ingredients:

Acorn Squash
2 Apples
Walnuts
Cinnamon
Brown Sugar/Maple Syrup
Dash of salt
Butter

Peeling the acorn squash can be a pain, but if you boil it for about 15 minutes then you can just peel the skin right off with your fingers (cool it first). Then cut it in half, scoop out the seeds, and then cut it into one inch chunks. Core and cut the apple into one inch chunks as well. Roughly chop the walnuts and throw them into the mix, then sprinkle on cinnamon, and brown sugar. If you don't have brown sugar, maple syrup works just as well. Don't go overboard on the cinnamon because it's so strong, but a liberal dose of brown sugar/maple syrup will make it nice and sweet. Sprinkle on salt to taste and add a few small dollops of butter to melt in when you cook it.

You can either bake it in the oven 350 degrees for about an hour, or put it in the microwave for 7 minutes, stir it, and cook it for seven minutes more. Serve hot.

Monday, November 2, 2009

Mr. Boy - Eggplant Parm


I found a guest blogger more from my heart. If Mr. Solo was the white collar, Mr. Boy is definitely the blue collar chef. The bottom line is he gets it done. Enjoy his first meal, cooked from vegetables that he picked with his own hands.

Mr. Boy's eggplant parm:

I like to keep recipes short and sweet. It shouldn't take much longer to cook it than it does to eat it.
Ingredients:

Eggplant
Mozzarella/Parmesan cheese
Tomato sauce
Eggs
Bread crumbs
Seasoning (Garlic powder, onion powder, oregano, etc.)
Olive oil

This is pretty much an eggplant casserole. Working as a sharecropper on a CSA farm, I have to find ways to make otherwise inedible food palatable, and voila! Turns out you can eat eggplant after all.

Preheat oven to 300 degrees.
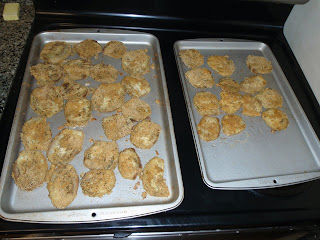
Beat the eggs together in a bowl, and on a plate mix the bread crumbs with your seasonings. Cut the eggplant into thin slices and dip them in the egg batter, then coat each side with the seasoned bread crumbs. You'll want to bake the eggplant first to make it nice and crispy, so lay the slices out on cookie sheets and drizzle olive oil over them. Then put them in the oven and bake them on each side for about five minutes.

Once both sides are baked, turn the oven up to 400 degrees and make the casserole while the oven is heating up. This is simply layering the eggplant, tomato sauce, and cheese. Start by covering the bottom of the dish with the breaded eggplant, then cover that thinly with tomato sauce, then cover that with cheese, then cover that with eggplant, that with tomato sauce, that with cheese, etc. until all your eggplant is used up. It can be two layers, three layers, really it just depends on how much eggplant you have and how deep your dish is. Bake that for 20 minutes or until the cheese is nice and melted.

Monday, October 26, 2009

Mr. Solo Part 2 - Grilled Cheese and Tomato Soup


The main man, Mr. Solo, is back for round two. Exciting news, I have two more guest bloggers lined up maybe more. And here he is....

Mr. Solo -
The idea for the second dish has actually been kicking around in my head for about a month for no better reason than hunger and the fact that my roommate and I seem to share a love of pan-fried bread. It's a grilled cheese sandwich with cream of tomato soup. Take some Challah bread, some dried oregano or other herb, and heat up some oil in a non-stick frypan. Throw the bread on there until it's soaked up most of the oil and is starting to brown. In the meantime baste some swiss cheese in truffle oil (you've essentially ended any effort to make this dish taste less than awesome once the truffle oil makes a showing). Flip your bread, throw the cheese on to melt for a few more seconds. For style points, add caramelized onions and chopped chives to the finished sandwich.

The tomato soup is actually pretty involved, but well worth the effort. You need to roast roma tomatoes with olive oil/herb of your choice (thyme works well) at 400°F for an hour. You also need to throw some standard tomatoes through a food processor, and then throw the pulp on a strainer with some salt in the fridge overnight. All the liquid drips out (incidentally, you've just made tomato water which has about a hundred amazing uses) but what remains is your very own homemade tomato paste. Fire up some onions on the stove with some butter, let them rock until they're translucent, throw in some rough chopped normal tomatoes, then the roasted tomatoes, thyme, bay leaf, and water to cover, and let that simmer down. When you're finding that the water is coming out of the tomatoes and things are trending more liquid than creamy, throw in your homemade tomato paste. It soaks up all the excess liquid like a friggin' sponge. When everything's softened down, throw your concoction through a fine-mesh strainer. Add a junkload of butter, a touch of heavy cream, salt to taste, back in the pot and crank the heat until the whole thing comes to a boil, then immediately turn off your heat. D for done.